A service I offer established authors is help with their WordPress website and incorporating WooCommerce for authors. . For years, my site sat as a stagnant place for me to journal to the abyss with little to no engagement. Pinterest is full of ideas on how to make money blogging, but affiliate blogging does not fit my brand or goals as a creative. The ONE thing I want to sell is fiction. How can an author sell stories on their website? By using an ecommerce plugin like WooCommerce.
Within months, I went from making no money on my WordPress site to making hundreds. So can you.
If after reading these instructions, you’re overwhelmed or have questions, you can reach out and schedule a free 30 minute consultation with me and I will answer as many questions as I can. You can also hire me to upload your entire backlist to an online WooCommerce store. Let me know how I can help.
How To Set Up WooCommerce for Authors On Your Existing WordPress Website
WordPress now incorporates the WooCommerce plugin as a standard feature on any new website. This is an extremely clever up sale. If you are running a free WordPress account, you have to upgrade to WordPress Pro in order to activate your store. If your existing Pro site does not have WooCommerce in the “Dashboard” Menu, you can simply download the plugin for free.

Now you’re ready to start your own online store where you can sell not only your signed paperbacks, but also digital downloads of your books and short stories.
Get Started with WooCommerce for WordPress
First, establish the address of your business (NOTE: This is required by law. I rent a post office box specifically for authorly purposes. For the safety of my family, I do not use my home address). Step 2, describing your sales model, is optional, but can help the plugin to suggest an optimal path for your business goals. Step 3 only applies to free WordPress Sites and requires you to acknowledge the change in your domain name and upgrading to WordPress Pro.


The Store Details
The next step is telling WooCommerce (and the world) what you’re selling. There are very few options, but since we work in the literary industry, I select “Education and Learning”.
Then you can choose the types of products you wish to list. Some features on product pages require upgrades. If your writing business expands to services, memberships, or customizable products, WooCommerce lists the monetary commitment required to include those fields in the ordering page. For your basic book sales, no additional funds are required. Select “Physical Products” and “Downloads”. Click “Continue”.
Business details can match the initial setup screen shot above. Select all that apply to your situation. In this same screen, you’ll be asked if you want the free feature of also downloading “WooCommerce Payments”. You do.
For your theme, continuity is best (unless it isn’t). If you are selling your stories from your author site, consistent themes and branding are important. If you are setting up a store for items that are not inline with your author branding, you can customize a different look and feel on the “Choose a Theme” page.
What You’ll Need To Continue
You are so close to making your first sale, you can almost taste it!!! But before you dive in, be sure to have the following things nearby:
- The correct title of the story
- I can’t be the only person who nicknames their books. Be sure the title you use matches those selling on other platforms like Amazon and Barnes and Noble.
- The back cover blurb
- The actual price of the book, and the price YOU want to sell it for on your site (this should not include tax or shipping).
- If digital, you’ll need (at the very least) a PDF version of your product.
- Standard WordPress will ONLY allow PDFs to be uploaded to your media library. To be able to offer .mobi or .epub files, you’ll need an additional plugin like Allow ePUB and MOBI formats upload
- Your ISBN
- Know the amount of stock you have on hand for physical items. You don’t want to over sell your inventory, especially with some prints being backlogged and publisher author copies delayed.
- Key words, if you choose to optimize your SEO around your books (you should, but this will not be covered in this post).
Adding a Product
The “Add New Product” page on WordPress will look very familiar if you have ever used the traditional blog editor. Simply start by filling in the details of your book. The title will go in the Product Name field. I like to add “(Autographed)” after the title for physical books. For digital books I will include the file type, like PDF, MOBI, and EPUB BEFORE the title. NOTE: WooCommerce does not allow variations of digital products. To work around this, simply list your file types as separate products.
Next paste your back cover blurb to the free text area. You do not need to add your cover art to this space.
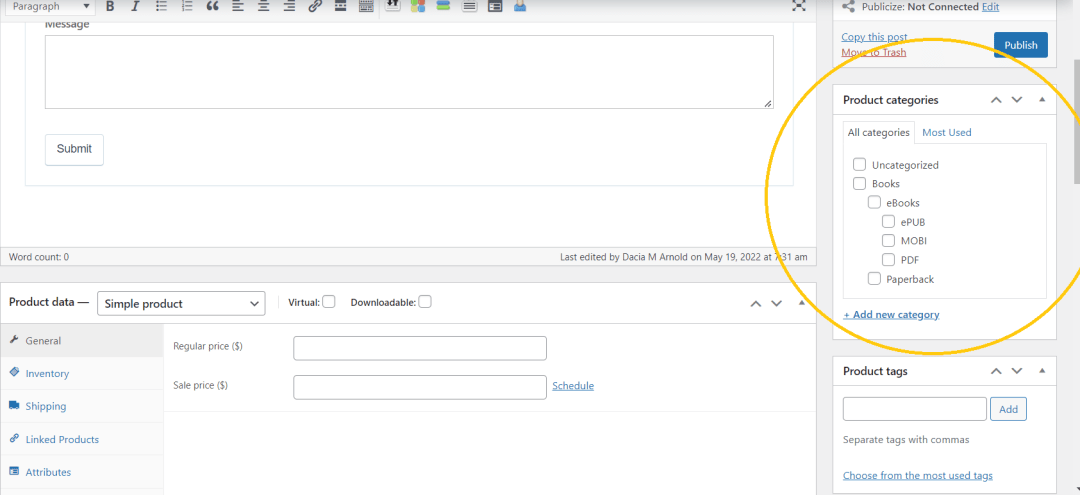
In the Product Data area, you’ll notice there is a lot going on. I will touch on only the essential parts.
- To keep it simple (pun intended), for books and digital downloads you will select “Simple Product” from the dropdown (is usually auto-selected) and select “Downloadable” for ebooks (select nothing else for physical books). “Virtual” offerings will be discussed in another post.
- In the “General” tab, add your price. It is your choice to note the actual retail price your book sells for on other sites. OR you can choose to only list your website price.
- NOTE: It is an industry practice to not charge additional for signed books. You DO NOT have to offer less than your book’s retail price, but you should not charge extra for your signature. I can say, with full confidence, it appears very pretentious. With this insight, do as you wish.
- All items should be taxable with a standard tax class. If you have an alternate situation, you’ll know what to select instead.
- Select Inventory beneath the General tab. SKU is where you can put your ISBN.
- For physical books ONLY:
- Select “Enable stock management at product level” (if this is a physical book), and enter the amount you have in stock.
- Unless you are able to communicate with potential customers on backorders, I would advise to select “Do not allow” for this option.
- Keep your stock threshold to 2 unless you do a high volume of website orders.
- Make sure your book is “In Stock”. If you are listing preemptively, there is no pre-order option here. If you’re selling a pre-order item, add pre-order to the title and include the date of release in the text area with your blurb. Set the stock to “In Stock”.
- For physical books ONLY:
- Shipping is not applicable to digital downloads. For physical books, shipping is managed in later steps. No other changes need to be made to this area.
You’ve completed your product data essentials. Next, locate the “Product Categories” along the right panel.

Select “+Add new category”. Write “Fiction” or whatever encompassing word you want to describe your written offerings. I will caution against using cutesy terms like “Musings” or “Word Vomit”. If I am searching for a book or story, I will not search these terms, and thus, never find your work. For this example, I am going to choose “Books”. Click the “Add New Category” button.
Select “+Add new category” again, and select the drop down for “Parent Category” and select “Books”. Repeat the above steps to add subcategories like novels, short stories, paperbacks, ebooks, or whatever logical organization method fits for your situation.
Lastly, and only for digital products, select “+Add new category” again, select the drop down for “Parent Category” and select “eBooks”. Then add “pdf”, “epub”, and “mobi” as sub-subcategories. Also make sure “Uncategorized” is unselected.
NOTE: Whatever your naming convention, make sure you are consistent. Only choose ONE category, ONE sub-category and ONE sub-sub-category. More on that in another article.
Finally, we will upload your product imagine by scrolling down and clicking “Set Product Image” in the right margin and following the instructions.

Aside from plugging in SEO key words, which we will not cover in this post, you are ready to click the “Publish” in the right margin near the top.
Get Paid!!!
You cannot skip this step.
You need to map your payment method to your store in order to sell anything. There are so many options you can offer your customers for paying you for your creative work. Due to the nature of banking information, I will not go into detail on how to set these up. When I work with clients, this is the portion they must complete on their own. I may, in the future, do a walk through on these items. Just not today in this post.
Taxes and Shipping
Allow WooCommerce to set your tax rate automatically to your customer’s location and you are done with this step.
Shipping is a bit more involved. This example is only for shipping within the US. Click “Add a shipping zone” and fill in the fields like the example below. I choose a flat rate of $5.00 based on the average costs for me to package and ship items. This can be slightly more or less depending on your location, but $5 shipping for media mail and packaging is widely accepted. Then click “Save Changes”.

Your Store is Live
Congratulations! You have an online store. To make it easy for your readers to find, Navigate to the “Appearances” tab on your dashboard and click on “Menus”. Find and click the box next to “Shop” then click the “Add to Menu” button. From there, you can choose in what order it appears in your main website menu.

You will find in the writing world, authors give a hand out as many times as they’ve been given a hand up. This is no doubt why I’ve becoming a book coach. Coaches are so much more than editors or web designers. They provide encouragement, but give you honest and actionable advice to better your craft. I spend as much time answering general questions about the publishing industry and processes as I do carefully evaluating an author’s platform. The sooner you partner with a writing coach, the faster you’ll move from having an idea for a story to seeing your hardback on the shelf of your favorite store.
Want to See what a Book Coach can do for you?
Are you interested in a free 30 minute consultation with a writing coach? Check out the services I offer, schedule a meeting, and let me help you reach your publishing goals.

